PowerShell Module Scaffolding with PSStucco
Note: this article is a remix. In 2023, Gilbert Sanchez wrote this article about using Stucco to quickly scaffold new PowerShell modules. Unfortunately, Stucco is no longer actively maintained. This article will instead talk about using PSStucco - a more active project forked from Stucco.
It all started one summer day… just kidding!
Gilbert started his article with this line as a joke, but for me, the really story did start one summer day in 2023! But you can skip the back story and jump to the recipe. I won’t be offended.
A Whole New World of PowerShell
It was the wee hours of July 4th, 2023. I couldn’t sleep because I was excited to see how many stars Locksmith had received overnight.
I had recently created my first “official” release of the Invoke-Locksmith.ps1 script and was blown away by the interest from the community. When I logged into GitHub, I saw an absolutely massive pull request (PR) from Przemysław Kłys (PK) which converted the single file Invoke-Locksmith.ps1 script into a full-fledged module using his PSPublishModule module (PSPM). After a bit of chatting with PK, I accepted the PR.
This was my first introduction to writing PowerShell modules, module templating/scaffolding, and more modern development techniques like “building” and “putting functions in individual files”. Before PSPM, I did everything by hand in a single script. I was using functions, but it was still a single 1000+ line script. It was just as painful as it sounds.
PSPM takes a much more modern approach of placing functions in individual .ps1 files and building the final module by assembling the individual functions. Because each function is its own file, it’s much easier to develop in an atomic fashion. One of PSPM’s biggest benefits to me are the health checks performed during the build process. The quality of Locksmith code went through the roof after PSPM.
More importantly, PSPM really changed the way I think about PowerShell, and I honestly think I wouldn’t be where I am without it. Unfortunately, I recently decided it’s time for me to move to something different. PSPM is a tool built by one guy for his own use, and it shows sometimes. I wanted something a little more community-driven and less idiosyncratic.
The Search for a New Scaffold
There are LOTS of PowerShell scaffolding projects out there, and they all have their pros and cons.
I tried Catesta and immediately loved the simplicity of installation, the module creation guide, and its integration with multiple CI/CD pipelines. (The inclusion of intentionally failing Pester tests in a blank module template was an interesting choice that I would not have made.)
I tried the much-beloved PowerShell Framework but beyond the basic module creation process, it didn’t fit the way I think.
Eventually, I decided to try Stucco because I’d heard good things about it from multiple members of the PowerShell community.
Stucco is described as:
An opinionated Plaster template for high-quality PowerShell modules
To quote Gilbert:
Some reasons I’m a huge fan
- Each function/cmdlet is its own file.
- Includes several high quality tests out of the box.
- It auto generates your docs via PlatyPS.
- Ready for deploying to the CI tool of your choice.
- Includes VSCode configs that make developing your code easy!
Stucco is Dead. Long Live PSStucco!
After reading the rest of Gilbert’s article, I decided it was time to dive in…
…And was immediately hit with errors. Some of the errors were easily resolvable (missing directories, mostly), but when I got to the section titled Run your Test, I never got the option to run Tasks.
I reached out directly to Gilbert and asked what I was doing wrong.
 So, I uninstalled Stucco and installed PSStucco. I created my first module and received no errors. Yay!
But yet again, I was not presented with the option to run Tasks. I’ve never used Tasks before, so I did a little research and discovered you have to add a repo directly to your VSCode Workspace to get Tasks to work properly.
 And it was that little conversation that sparked the idea for this article!
Enough Talk! Let’s Go!
In this section, I am going to step through the following sections of Gilbert’s article and provide comments and updates to show where things differ from Stucco to PSStucco.
- Install Stucco
- Create your GitHub repo and check it out
- Create your Stucco module
- Run your Test
- Commit your code
- Prep for PSGallery
- Publish your module
Install Stucco PSStucco
Install-Module -Name PSStucco -Scope CurrentUser -Force
Install-Module -Name Plaster -Scope CurrentUser -Force
Install-Module -Name PowerShellBuild -Scope CurrentUser -Force
This should be pretty self-explanatory, but to use PSStucco, you have to install PSStucco.
I also manually installed Plaster and PowerShellBuild because they didn’t install automatically. I’m not sure why, but I’m too tired from vacation to troubleshoot.
GitHub Repository
Follow Gilbert’s article to create a new GitHub repository using the web interface. If this is your first time creating a GitHub repo, his article is a little light on details. But if you’ve never used GitHub before, you’re probably not the target audience for this article anyway.
To clone this newly created repo to your local computer, do the following:
git clone https://github.com/[YOUR_USERNAME]/[YOUR_NEW_REPOSITORY_NAME].git
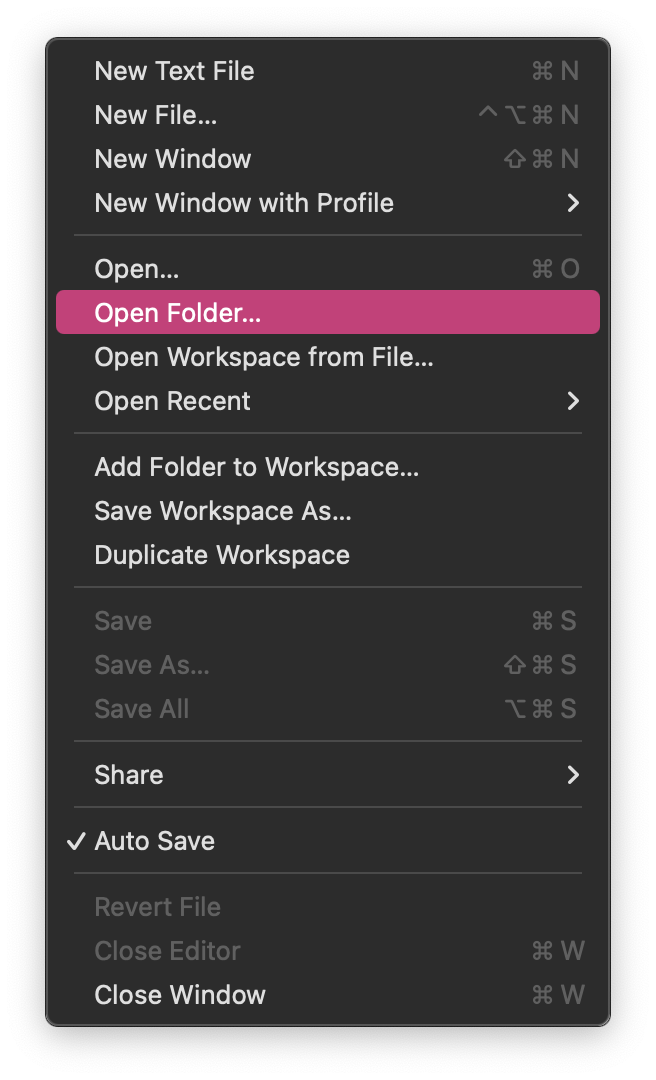
NEW: Add the Repository Folder to Your Current VSCode Workspace
As discussed earlier in this article, for task-based steps to work properly, your newly created repository folder needs to be added to the VSCode Workspace directly. You can either open the folder directly in VSCode to create a new Workspace:
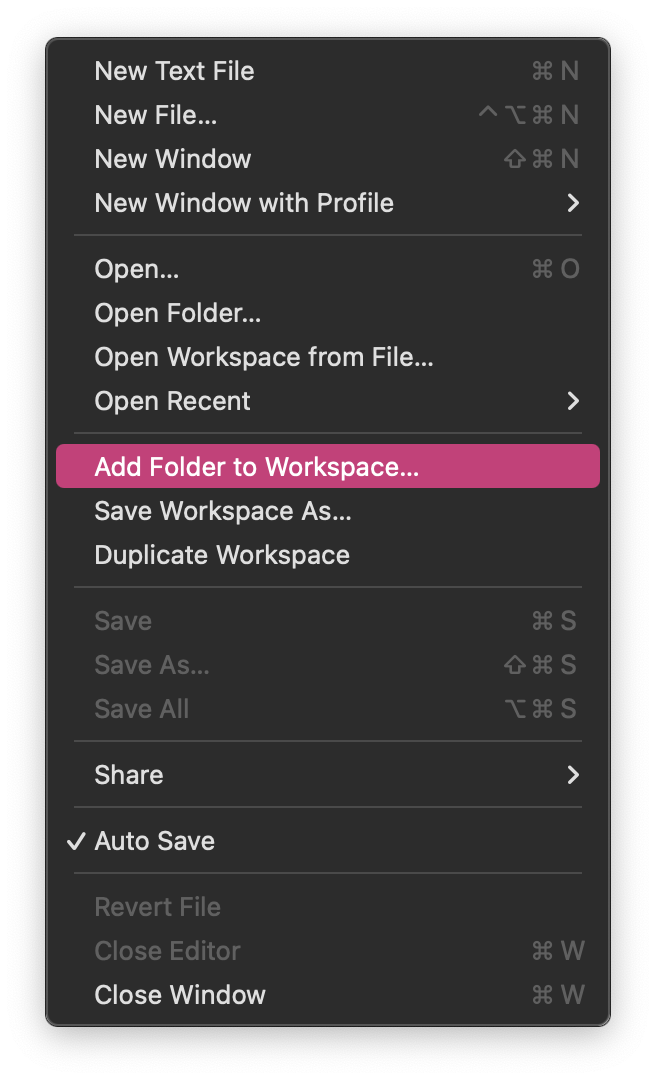
 OR add the folder to your existing workspace:
Create Your Module
No notes! Great work, Gilbert!
Run Your First Test
As previously mentioned, ensure your local repository folder is added directly to the VSCode Workspace, or you will not see the available Tasks.
Note: writing tests is a whole-ass thing. I don’t really do it for my projects yet. Maybe I’ll write about it when I do.
Commit Your Code
Gilbert describes how to commit code using the command line, but since we’re working in VSCode, let’s talk about that instead!
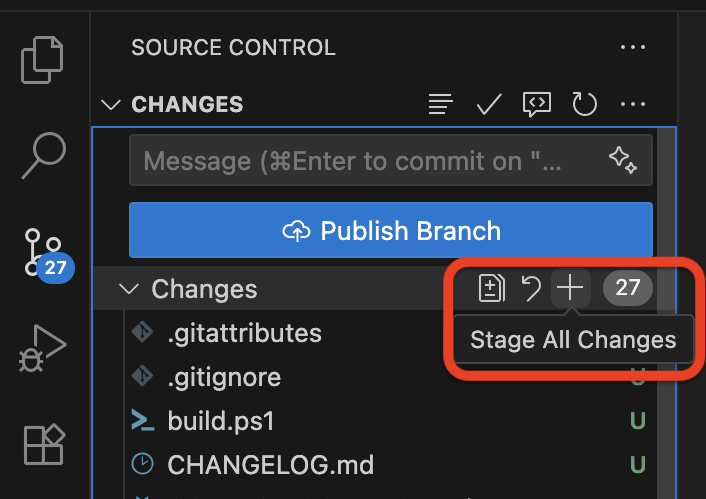
- First, you’ll want to stage all changed files by switching to the “Source Control” section and clicking the + button:
- Then you want to describe your changes with a “commit message” and click the “Commit” button:

- After you’ve committed your changes, you need to push said changes from your local repository to the remote repository. You can do this by clicking the “Publish Branch” button… that I forgot to screenshot!
Setup PSGallery
No notes here, either. 👏
Publish Your Module!
Once you’re built your cool module that does cool things, you can use GitHub Actions to publish your module directly to the PowerShell Gallery. GitHub Actions are configured using YAML files placed in your repository’s .github/workflows directory. You can do ALL kinds of cool stuff with GitHub Actions (and I really need to learn how to use them more.)
Gilbert provides an example publish.yaml file in his article, but it’s kind of out of date. However, I was able to take his version and update it with current info. Feel free to use mine below. Just make sure to change [YOUR_MODULE_NAME] to your module name!
on:
  push:
    branches:
      - main
  workflow_dispatch:
jobs:
  build:
    runs-on: windows-latest
    steps:
      # Get the current version
      - uses: actions/checkout@v3
      - name: Install and cache PowerShell modules
        id: psmodulecache
        uses: potatoqualitee/psmodulecache@v6.2.1
        with:
          modules-to-cache: BuildHelpers
      - shell: pwsh
        # Give an id to the step, so we can reference it later
        id: check_if_versions_bumped
        run: |
          [version]$GalleryVersion = Get-NextNugetPackageVersion -Name [YOUR_MODULE_NAME] -ErrorAction Stop
          [version]$GithubVersion = Get-MetaData -Path ./[YOUR_MODULE_NAME]/[YOUR_MODULE_NAME].psd1 -PropertyName ModuleVersion -ErrorAction Stop
          $bumped = $GithubVersion -ge $GalleryVersion

          # Set the output named "version_bumped"
          Write-Host "::set-output name=version_bumped::$bumped"

      - name: Publish to PSGallery
        shell: pwsh
        if: steps.check_if_versions_bumped.outputs.version_bumped == 'True'
        env:
          PSGALLERY_API_KEY: $
        run: ./build.ps1 -Task Publish -Bootstrap
This set of actions will run every time new changes are committed to the main branch of the repository. It installs all required modules using Chrissy LeMaire’s PSModuleCache, builds the module, then publishes it to the PowerShell Gallery. All automagically!
Quoth the Gilbert:
And that’s it! You now have a module that’s testable, open source, and automatically published to the PowerShell Gallery!
Wrap Up
I hope I was able to clear up some of the hiccups you may run into when trying to use PSStucco, but please read Gilbert’s original article first. If you have any questions or comments, feel free to reach out. I love to chat with folks about PowerShell!